Installing Crown Molding On Kitchen Cabinets : How To Install Crown Molding On Kitchen Cabinets - YouTube - Pimp my cabinets phase 3 crowning achievement sarah s big idea.
Installing Crown Molding On Kitchen Cabinets : How To Install Crown Molding On Kitchen Cabinets - YouTube - Pimp my cabinets phase 3 crowning achievement sarah s big idea.. When installing on a wall, use the pneumatic nailer to secure the crown molding at the wall studs. If you don't, worry not. House flipping brothers dave and rich show how to install kitchen cabinet crown molding and trim with tips.this video covers all aspects of cabinet molding i. Watch to learn the best method for applying the glue to kitchen cabinet crown molding. Provide a nailing surface for crown moulding by attaching solid wood mounting strips to the top edges of the cabinets.
You can also notch them so the bottom of the angle will sit completely flush with the front of the kitchen cabinets. Usually the angle will be around 35 degrees. Use a combination square to draw a line across one board connecting the inside and outside. Installing crown molding on kitchen cabinets is one project that takes a little bit of skill but is totally doable. House flipping brothers dave and rich show how to install kitchen cabinet crown molding and trim with tips.this video covers all aspects of cabinet molding i.
Install Kitchen Cabinet Crown Moulding | Kitchen cabinet crown molding, Crown molding kitchen ... from i.pinimg.com Pimp my cabinets phase 3 crowning achievement sarah s big idea. There are dozens of sizes and patterns to choose from, and you can even combine multiple moldings for a chunky look. Steps for installing kitchen cabinet crown molding: Installing crown molding on kitchen cabinets. Not only do you have to be aware of an inside corner, outside corner, right board, or left board, you also have to magically hold the crown molding up against your miter saw fence at just the right angle or else your corners will never fit together. Measure and mark the front section of crown molding to the cabinet width. Cabinets with crown moulding (how to install crown molding on kitchen cabinets) installing nailer strips. Cut at one mark, then move the molding along to the next mark.
Measure and mark the front section of crown molding to the cabinet width.
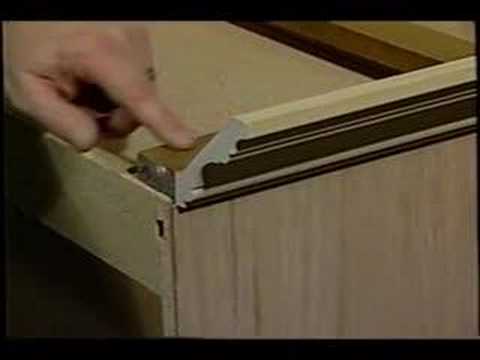
When installing on a wall, use the pneumatic nailer to secure the crown molding at the wall studs. Installing crown molding on kitchen cabinets is one project that takes a little bit of skill but is totally doable. Check out our video review and demo of adding crown molding to your kitchen cabinets. Make a square cut on the uncoped end of the crown moulding. If you have any questions, you can ask me in the comment section. Installing crown molding on kitchen cabinets takes a whole lot of accuracy and precision in cutting, especially the corners. In this video we will go over some tips and tricks that might help whe. Use one long strip for a row of cabinets. House flipping brothers dave and rich show how to install kitchen cabinet crown molding and trim with tips.this video covers all aspects of cabinet molding i. Unless there is ample room above the doors to attach a crown molding, or if you are using a very wide crown molding, you will need to install a nailer strip to support the installation. Carefully remove existing molding using hammer and flat pry bar. We didnt add skins to the sides of the refrigerator cabinet or the side of the wall cabinet. Provide a nailing surface for crown moulding by attaching solid wood mounting strips to the top edges of the cabinets.
Provide a nailing surface for crown moulding by attaching solid wood mounting strips to the top edges of the cabinets. Mark all sides of the cabinet onto which you will be attaching crown moulding. We didnt add skins to the sides of the refrigerator cabinet or the side of the wall cabinet. Then, you will need to prep the baseboards and attach them in place. There are dozens of sizes and patterns to choose from, and you can even combine multiple moldings for a chunky look.
Cabinet Crown Molding - YouTube from i.ytimg.com Installing crown molding on kitchen cabinets pretty ideas 12 first cabinet ikea remodel. Kitchen kabinet installing crown moulding on cabinets rta. Cut at one mark, then move the molding along to the next mark. When installing the top of a cabinet, space the finish nails about 12 to 16 inches apart. Cut the wood structure (holder) pieces at the same exact angle as the crown molding (aka: There are dozens of sizes and patterns to choose from, and you can even combine multiple moldings for a chunky look. It's important to choose the right glue as you learn how to install crown molding on cabinets. Carefully remove existing molding using hammer and flat pry bar.
Cut at one mark, then move the molding along to the next mark.
Use a pin nailer to nail into the corners of the two pieces of crown molding image 2. When installing the top of a cabinet, space the finish nails about 12 to 16 inches apart. Crown molding can give your cabinets an extra air of charm and sophistication. Not only do you have to be aware of an inside corner, outside corner, right board, or left board, you also have to magically hold the crown molding up against your miter saw fence at just the right angle or else your corners will never fit together. This size depends on your cabinet's size. It's important to choose the right glue as you learn how to install crown molding on cabinets. Provide a nailing surface for crown moulding by attaching solid wood mounting strips to the top edges of the cabinets. If you have frameless cabinets, adding a panel to the side of the taller cabinet that's flush to the face of the door will maximize the space to land the lower crown. Make a square cut on the uncoped end of the crown moulding. Make sure the pieces are together and in place snugly. After that, you will need to file off the front and side stiles of your cabinet. Installing crown molding on kitchen cabinets pretty ideas 12 first cabinet ikea remodel. Use a combination square to draw a line across one board connecting the inside and outside.
Unless there is ample room above the doors to attach a crown molding, or if you are using a very wide crown molding, you will need to install a nailer strip to support the installation. Make a square cut on the uncoped end of the crown moulding. And that means no tricky compound angles to. To easily install crown molding around the cabinets on your ceiling, you'll first need to make sure that you have the necessary tools. Use a pin nailer to nail into the corners of the two pieces of crown molding image 2.
kitchen cabinets to the ceiling or not | www.Gradschoolfairs.com from i0.wp.com Provide a nailing surface for crown moulding by attaching solid wood mounting strips to the top edges of the cabinets. Mark all sides of the cabinet onto which you will be attaching crown moulding. And that means no tricky compound angles to. Miter that end of this strip and then attach it to the backing wood with the nail gun. Crown molding can give your cabinets an extra air of charm and sophistication. Step 6 fill in the nail divots and joints With crown molding it seems like there are 10 considerations to make for every single cut. When installing on a wall, use the pneumatic nailer to secure the crown molding at the wall studs.
Fortunately, anyone comfortable with a miter saw and brad nailer anyone can install crown molding.
Crown molding installing trim and molding kitchen cabinets step 1 attach 2x4s measure behind the front stile of your cabinet, and cut a 2x4 to fit this length. Watch to learn the best method for applying the glue to kitchen cabinet crown molding. Unless there is ample room above the doors to attach a crown molding, or if you are using a very wide crown molding, you will need to install a nailer strip to support the installation. Installing crown molding on kitchen cabinets. Start by assessing the cabinets. Make sure the strip's front edge and the top of the molding are flush, as shown at right. (use one long strip for a row of cabinets the same depth.) then apply wood glue to each strip, nail it in place, and let dry. Pimp my cabinets phase 3 crowning achievement sarah s big idea. Cut at one mark, then move the molding along to the next mark. First, select a crown molding with a vertical height about the same as the narrowest gap between ceiling and cabinet. Step 6 fill in the nail divots and joints And that means no tricky compound angles to. Use one long strip for a row of cabinets.